Popular Posts

Foodbuzz
Showing posts with label Outdoor Grilling. Show all posts

Thursday, March 22, 2012

Start Your Grill Engines Muscle Car BBQ Grill Has Arrived


Start your Grills!

The Summer checker flag is right around the corner. Time is waisting and Grilling time will be here before you know it.

I had to share this photo from Facebook and GIC Car Clinic this morning. This is to funny! It is actually a grill engine. It caught my eye and couldn't resist.

So for all you race fans this ones for you!

Happy Spring

Wednesday, June 8, 2011

Fresh Tasting Homemade Easy No Cook BBQ Sauce

If you have a couple minutes why not make your own BBQ Sauce! This recipe is easy and you may just have all the ingredients in your pantry all ready! It takes a couple minutes and you end up with a "fresh tasting" homemade no cook BBQ Sauce!

  • 1 1/2 C Ketchup
  • 1/2 C Molasses
  • 1 1/2 tsp Cider Vinegar
  • 1 tsp Hot Sauce
  • 1 tsp Liquid Smoke (it's all natural too!)
  • Salt
  • Pepper
Combine in a mixing bowl and whisk to incorporate flavors! No cooking needed. Go ahead and taste it! You will be surprised ;)

You can also be brave and ad you own flavors for that special touch. Rosemary, Garlic, more hot sauce the list is endless.... beer!

Have fun ;)

Enjoy!

Top Five BBQ Winners From Country Looks Magazine

For all you home Cooks that love to grill outdoors or in, here is the Top 5 BBQ Sauce Winners from Country Looks Magazine.

They have tested and tasted tons of brands to come up with a Top 5 list.

Number 1 Choice: Bulls-Eye Original - for the best sweetness & smokey taste.

Number 2: KC Masterpiece - for robust spice, smoke and smoothness.

Number 3: Sweet Baby Rays - for the sweetest of the bunch.

Number 4: Hunt's Mild - for tastes mild like ketchup, kids love it.

Number 5: Kraft Original - for best smoke.

So here are the Top 5 BBQ Sauces for any taste preference.


Enjoy :)


Tuesday, January 25, 2011

Valentines Veal Chops Made Easy!

Valentine Veal Chops made easy!

Why not treat your someone special to something a bit special. Try Veal Chops!

Go to your local Butcher and get a fresh cut Veal Chop (one per person). There was some in the case but I asked if they had some in the back and they said yes and they would be cut fresh ;)

The color will be bright pink and will have no smell.

Season with salt, fresh cracked black pepper and drizzle with olive oil. Let sit and bring to room temperature.


Preheat your grill or grill pan to med high heat.

Here I used a cast iron well seasoned grill pan.

When the grill is good and hot place your Veal Chop on the grill cook for three to four minutes on each side depending on how well done you would like your meat. To keep from serving "cold" meat in the center, make sure you bring the meat to room temp prior to cooking.

Remove from heat add a dab of butter, cover and let the meat rest for about five minutes before serving.

Serve with Cheesy Hash Browns and Wine Pick Of The Day! Guenoc Meritage Red Wine 2006

Enjoy!

Tuesday, September 14, 2010

Karen B's Shiney New Toy A Weber Grill

Here she is!!

My shiny new toy, a Weber Grill! YeeHaw!

I am so excited! She (yes She) was just delivered off the truck two minutes ago!

Out with the "very"old rusty one to the recycle bin and in with the new ;)

Stay tuned for some fab recipes all Winter long from Karen B's Cooking Made Easy!

Happy Grilling ;)

Thursday, September 9, 2010

Kickoff Football and Tailgating with 1001 Grill Covers.com

Today is the Official Kickoff Day for Football in New Orleans!

Kickoff Day means get your Grill Covers off it's time to tailgate!

Barbecue and Grilling are one of the mainstays for all football games and parties. Barbecue Grill Covers are a necessary accessory to protect your grill from the outdoor elements. So why not find a cover that not only protects your grills but looks great as well.

1001 Grill Covers.com can help you. They have a wonderful selection of Barbecue Grill Covers available to choose from.

1001 Grill Covers.com goal is:

"To provide their customers with the largest selection
of grill covers and the best possible prices!"

I love the Chili Pepper covers for the Kettle Grills and Smokers! How fun is that!!

Their selection of Grill Covers includes Cart Grill Covers, Kettle Covers and Smoker Covers that come in many many designs. You can choose from stripes, solids, chili Peppers and for all you Football fans out there OHIO State and PENN State now in stock.

I also wanted to let you know that this company always offers FREE shipping inside the U.S. and Canada!

Happy Official Football Kickoff Day!

Bookmark and Share

Thursday, August 12, 2010

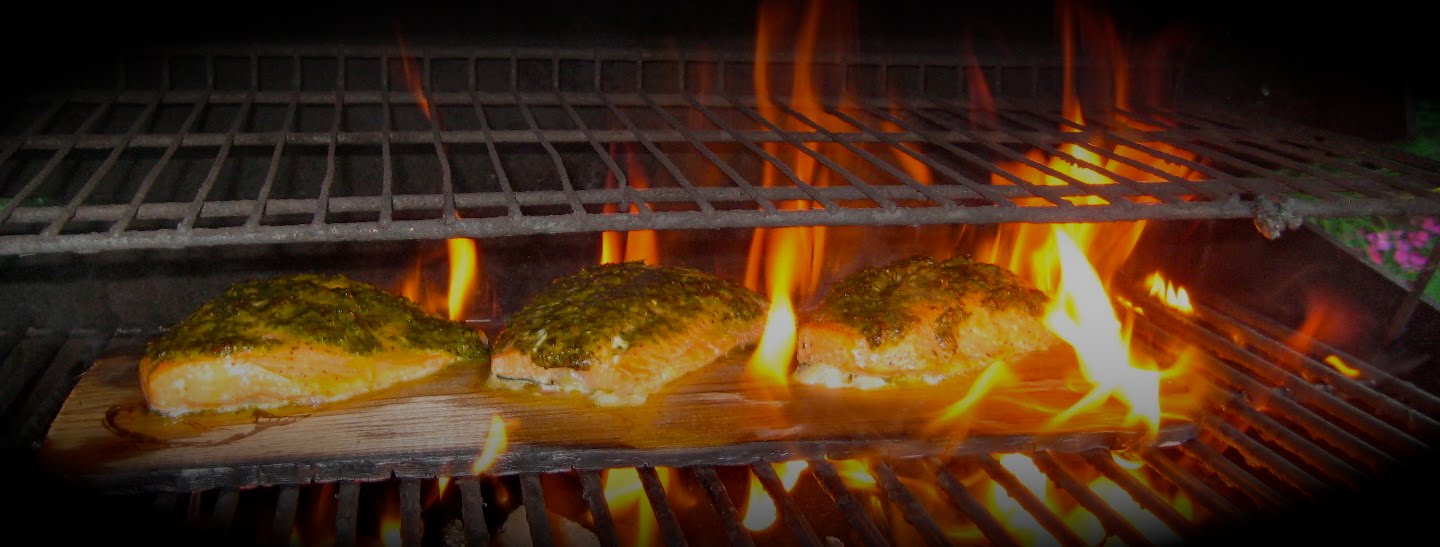
Cedar Plank Grilled Pesto Wild Alaskan Salmon


This Pesto Salmon will not only taste great but will impress as well!

You will need to get some Cedar Planks. They can be found at cooking stores, Costco, Home Depot and Lowe's. If you cannot find some go to the local home improvement store and have some cut into about a foot and half long pieces. That is actually the least expensive way to buy them.

Soak the board in water for a few hours prior to grilling.

Ingredients:

  • Wild Alaskan Salmon (one fillet per person) skin on
  • Pesto
  • Salt and pepper
  • Fresh Lemon
Preheat your grill.

Rinse and pat dry the Alaskan Salmon. Season with salt and pepper.

Add about two tablespoons of Pesto and spread all over the top of the fillet.

You are now ready to have some smokey fun ;)

Place your cedar plank on the heated grill reduce to medium heat. Close the lid. when you hear the wood start making that snap crackle and pop sound your ready to add the Salmon.

Place the Salmon on the board carefully skin side down of course (no need to oil the board).

Close the lid and cook for 15 minutes.

The wood may catch fire and turn black but the fish will not. Don't be shocked. If you have soaked the board you are fine. I have even soaked the board in less time (being in a hurry) and I have had the fish turn out perfect.

When the fish is flaky but not dry your done.

Remove the board with mitts (hot).

Take a metal spatula and remove the Salmon from the board leaving the skin stuck to the wood! Work the starting point a bit and you will be able to feel when you are between the skin and the flesh of the fish.

You will have a wonderful pesto smoke flavored piece of fish that everyone will love.

Squeeze some lemon on top and serve!

Enjoy!

Wednesday, July 14, 2010

Grillin And Chillin Outdoors

Summer is upon us and that means grillin and chillin outdoors. Long gone are the wood decks, a simple round table with a metal and vinyl umbrella centered in the middle of it. We have added an additional room to the house plans these days. The outdoor room.

In this new addition to our houses we have the outdoor dining room along with a living area. Well depending on how much room you actually have in your back yard! The new dining room furniture has improved so much so over the last few years you can practically leave it out year round and enjoy it! Even the cushions are weather proof.

I have been looking for some really fun dishes for outside and came across this one that I fell in love with. My colors are brown and green and this set matches perfectly. The best part is no matter how much you screw up the food it will still look good!
So the traditional round table top is now "out" look here at what I found! This set is fab for a evening gathering out side. Perfect with plenty of room for decorations, lighting and the food.


Furniture for outdoor dining room's come in many new styles now. Contemporary, Modern.. oh and of course there still is the re designed wicker that never goes out of style.

I really think this little bistro set out of wood and wicker is cute! An updated version of the old stand by. Add some candles, outdoor lighting in the trees, a fire pit and your good to go!

Be creative and have fun designing your new outdoor space! By basic clean lines that will go with any color or cushion style to get the most out of what you decide on.

Have a great Summer

Tuesday, June 15, 2010

Slow Cooked BBQ Pork Loin Back Ribs


Slow cooked BBQ Ribs are one of the best tasting dishes you can make if you take the time to do it.

These ribs fall off the bone! You don't even have to get your fingers messy just the way my Husband likes it! We had the four of us and two additional for dinner. I put some take home containers out for them to take the leftovers home.... that never happened, we ate them all ;)

My recipe is simple but it takes most of the day to cook, well worth the wait!

You will need the following for what I made here for 4 adults and 2 children with NO leftovers:

Ingredients:
  • 5 lbs trimmed Pork Loin Back Ribs (here there are two racks)
  • One large orange
  • 6 Heads of garlic
  • 1 Large handful of fresh herbs (Thyme, Sage, Oregano, Chives, Rosemary)
  • One Large Onion or Leek
  • BBQ Sauce (I use Sweet Baby Rays)
  • Water
  • Salt
  • Fresh ground black pepper
  • Soaked apple wood chips for smoking
Preheat oven to 325.

In a large roaster or as I have here a full sheet deep hotel pan, zest and cut into wedges one large orange. Squeeze juice and toss all into pan.


Grate and or chop the cloves of garlic, chop onion (I used a leek) toss into pan along with the bunch of fresh herbs, I stripped some of the Rosemary and Oregano then chopped to get the flavors going.

Season heavily with salt and pepper.

Pour on about 1 cup to 1 1/2 cups BBQ sauce.

Rinse and pat dry your 5 lbs of Pork Loin Back Ribs.

Place ribs into pan and add enough water to just cover the meat.

Stir all the ingredients to combine, flipping the meat a couple of times to coat well.

Place ribs bone side up as shown here:


Place ribs into preheated oven and reduce heat to 240. I roasted the ribs uncovered for about six hours checking about three times during cooking to spoon liquid over ribs and stirring the herb liquid mixture.

The ribs are ready when you can pierce with a fork and the fork slides in easily. If the meat is still real firm cook a bit longer. You want it out before it starts to fall off the bone.

Remove and set aside until you are ready to eat.

When you are ready to eat or close to heat the grill and apple wood chips if your smoking. After the chips start to smoke reduce heat.

Place the ribs on prepared foil (non stick cooking spray and poke holes in foil with knife to let the smoke through) and place on top rack of grill. If your smoking let the ribs soak in some of the smoke for a few minutes. Coat with your favorite BBQ Sauce on both sides, shut grill lid and let the sauce heat up. Do this step two to three times until you get the coating you like.

TIP: preheat your sauce in a sauce pan prior to glazing the ribs for better results.

Ribs are done when they are heated through and the sauce is thick and yummy!

Enjoy!

Monday, May 17, 2010

The Propane Grill

This was guest posted by Randy Interrer

I receive several different newsletters full of recipes. Last summer I kept getting recipes that were made on a propane grill. I decided that I had to have one of these for this upcoming summer. I honestly knew nothing about grilling besides what I had watched other people do.

First I logged onto my Hughes Net satellite internet and started to search. I was amazed at the different price ranges grills are available in to purchase. There are ones starting at $50 and on up to thousands of dollars. I knew that I wanted propane since charcoal is messy and I wanted to be able to use it often. I started researching and since we have a family of 4 realized that I did not need a huge one. I did not mind if it was plain black. I didn't need anything fancy like stainless steel.

K-Mart was the site I finally ended up on after all my research. I was able to find a grill that had an upper rack. I thought this was important for cooking more items and also to separate side dishes that need to cook longer. I also wanted it to have one side burner. This would be nice for cooking baked beans or boiling water for various other dishes. I was surprised that since I waited till end of season I was able to buy it for almost half price. I had my friend look too, using his WildBlue internet too see if he could find any better deals, but he couldn’t.

I left it in the box all winter and recently got it out to put together. Now I will say, putting it together was a headache. It took me forever! If you ever buy one, purchase it already assembled. I have cooked on my grill twice now and I am very impressed with it! It cooks well and the food comes out perfect.


Tuesday, March 30, 2010

Spring and Summer Dining Outdoors


Spring is here, Summer is right around the corner! It's time to get that patio set out of the garage and cleaned off.


We now have extended our homes by bringing the inside outside. A grill and a folding lawn chair has come along way. Outdoor couches, rugs and pillows extend the beauty of our style. Oh and don't forget the ambiance and mood set by outdoor step lighting I love the look of the round step and deck lights in ceramic, such a elegant touch to my rod iron set that never goes out of style.


Hanging strands of lights, torches, candles and outdoor step lighting are all the little accents you need to make your look complete. Oh, and it serves a purpose too!


So update your old looks with some new chic items, who said that skewer has to be straight? It doesn't fit on your plate, why not bend it!!! Try it you will be pleasantly surprised ;)


Skewers are used for more than grilling. Try my recipe: Caprese Salad Skewers With Basil Vinaigrette at your next outdoor dinner. Such a great Appetizer perfect for outdoors and a party favorite while sipping lemonaide or Spring Sparkling White Wine Sangria on a lazy Saturday afternoon while Cooking The Perfect Steak on the grill.


Keep your eyes peeled, we have some great product reviews heading your way soon ;)

Happy Cooking ;)


Sunday, February 7, 2010

Game Day Better Grilled Hot Dogs Indoors Or Out

Here is a great tip for grilling better tasting hot dogs every time!

Cooking your dogs this way prevents over burning on the grill when you are trying to get them cooked and heated in the center.

Ingredients:
  • Your favorite brand of hot dogs
  • Two garlic cloves sliced
  • One tablespoon salt
  • Saucepan with water
In a sauce pan add water, garlic cloves and salt. Bring to a quick boil and reduce to simmer. Add the hot dogs and simmer until cooked and heated through.

Remove hot dogs from water and place on your prepared grill. Grill until desired doneness. You can do this on your outdoor grill or use your indoor grill pan. For a party you can keep the hot dogs in the water until your ready to grill.

Perfect hot dogs every time.

Enjoy ;)

Tuesday, September 29, 2009

Grilled Vegetables For Better Flavored Dishes!

The next time you make Pasta Sauce or and dishes that calls for vegetables try grilling your vegetables first.

Grilling the vegetables instead of sauteing them gives them a more smokey grilled flavor. I did this the last time I made Spaghetti sauce and we all loved it.

I just oiled my grill pan, sliced the veggies, seasoned with salt and pepper and grilled until they got nice grill marks. Then, I chopped them up and finished my sauce as I normally would.

Try it you will like it!

Enjoy!

Saturday, September 5, 2009

Labor Day Corn On The Cob With Dill Butter

Mix it up a bit the next time you cook Corn On The Cob. Top it with quick and easy Dill butter.

If your grilling the corn or boiling it works for both.

Grilling Corn:
  • Peel back husks remove the corn hair (leave husks attached)
  • Soak in five gallon bucket for 1/2 hour.
  • Brush Dill Butter on Corn close up the husks and tie the end shut with string.
  • Grill Corn until tender, turning every five minutes and cook on all four sides.
Dill Butter:
  • One stick butter
  • Two to Three Tablespoons finally chopped Fresh Dill.
  • 1/2 Teaspoon Salt
  • Dash of Fresh Ground Pepper if desired.
Combine Butter, Dill, Salt and Pepper mix well.

Friday, August 7, 2009

Garlic and Oregano Grilled Pita Bread

Summer is time for grillin and chillin! What better way to add fun ingredients to your menu than grilling.

Grilled Pita Bread with Garlic and Oregano (from our friends at Gourmet) is a family friendly addition to any meal.

I made this side dish and loved it! However I did add some more herbs the second time around. You can change this recipe to your liking or use what ever you have in the pantry ;)

Ingredients:
  • 3 Tablespoons extra virgin Olive Oil
  • 2 Garlic Cloves, smashed
  • 2 Tablespoons finely chopped Oregano
  • 6 (6" - 8") Pita Bread Rounds (with out the pockets works best)
  • Kosher Salt to taste
Preheat the grill.

Heat Olive Oil in small skillet on medium heat, cook Garlic until golden brown not burnt, remove garlic and discard. Remove oil from heat and stir in Oregano (or other herbs).

Oil grill and grill the Pita Rounds for about two minutes or until light grill marks appear on the bread. Remove from grill.

Brush both sides with the Garlic, Oregano flavored Olive Oil and sprinkle with salt to taste. Cut into wedges and serve.

Enjoy!

Sunday, July 19, 2009

Apple Wood Smoked Chicken On The Grill


I like the flavor of "smoked food" but don't like the amount of time it takes to acquire the wonderful taste. So when your craving the smoked flavors and don't have allot of time on your hands here is a quick and easy recipe!

Ingredients:
  • Apple Wood Chips
  • Aluminum Pan
  • Aluminum Foil
  • One 3 1/2 - 4 lb. Chicken (halved)
  • Dry Rub
Dry Rub Ingredients:
  • Granulated Garlic
  • Dried Tarragon
  • Paprika
  • Dried Italian Seasonings (By McCormick)
  • Dry Mustard
  • Salt
  • Pepper
In water soak enough Apple Wood Chips to cover the bottom of a 1/2 sheet pan size aluminum pan for 3 to 4 hours prior to cooking time. I use Weber Grill Company's Chips you can order through the mail or just get chips from the supermarket. Weber's chips are great because they have big chunks as well as small. The larger ones last longer.

Prep the grill. Cover the second shelf with two layers of foil and pierce with tiny holes to let the smoke through to the chicken. Spray or brush the foil lined shelf with oil heavily to prevent the chicken from sticking.

Place Pan with chips on lower shelve next to the flame. Add an inch or so of the soaking water to the pan.

Prepare the chicken:


Add one tablespoon of all the dry ingredients except the salt and pepper into a small bowl. Add 1/2 teaspoon Salt and 1/2 Teaspoon Pepper to the bowl. Mix well.

Sprinkle both sides of Chicken with the dry rub coating evenly, turning carefully. Use all the rub.

Preheat the grill to high to get the Apple Wood Chips going. When the grill starts to smoke the the temp is registering high, place the chicken halves on the foil skin side up over the pan with the Apple Wood Chips as seen here:

Close the grill after about two minutes (letting the grill heat back up) reduce the heat to medium low. After 40 minutes check the Wood Chip Pan and add some of the soaking water if needed close lid quickly.

When the chicken has been in an hour, check the internal temperature of the chicken, if it registers "done" (180) shut the grill lid to reheat for a couple minutes and then turn off the grill and do not open the lid. Let the chicken continue to smoke for an additional hour.

You will find the smoked taste wonderful! Slice and serve with a pasta or potatoes and vegetables.

Pasta suggestion (click link):

Enjoy ;)
Bookmark and Share

Monday, June 1, 2009

Summer Brats and Italian Sausages On The Grill

It's almost summer time!  Everyone loves to cook out doors.  If it's dinner or a party this easy recipe will definitly keep them coming back for more!

At the supermarket pick up some "fresh" Brats or Italian Sausage.

Ingredients:
  • Brats or Italian Sausage Links (1 to 2 per person)
  • Two Cloves Garlic - Minced
  • One Large Spanish Onion (yellow) cut in half and sliced 
  • One Large Green Pepper - cut in half and sliced 1/2" thick
  • One Large Red Pepper - cut in half and sliced 1/2" thick
  • One Large Yellow or Orange Pepper - cut in half and sliced 1/2" thick
  • 2 - 3 Bottles of Beer (depending on how many people you have)
  • Dried Oregeno
  • Salt
  • Pepper
  • Red Pepper Flakes (optional)
  • Good Fresh Hoagie or Sausage Type Buns
Place the Onions and Peppers into a heated large fry pan coated well with olive oil.  Toss in the Garlic, Onions and Peppers, season with the oregano, salt and pepper.  You will go heavier than usual with the oregeno.  When they are just sauteed and the onions start to turn color transfer to a grill safe pan (I used the disposable aluminum 1/2 catering pans from the market).

Pour the beer into the Onion and Pepper mixture, place pan on the grill to heat.

Just brown your sausages on the grill to a nice brown color not burned and under cooked.

Transfer the sausages to the Onions, Peppers and Beer pan.  Let simmer until the sausages are cooked through.  You can remove the pan if needed at this time, it will keep the sausages hot until your ready to serve.  I just leave it on the grill.

In a large bun place on the of sausages and top with the Cooked Onions and Peppers!

Serves 6 Adults (add more Onion, Peppers and Beer for larger parties)

Enjoy!


SHARE WITH FRIENDS

Bookmark and Share
Related Posts with Thumbnails